

1
Go to Zapier using this link https://zapier.com/developer/public-invite/126192/8b1668cb8e59d9493d4128ea61a1270e/ and create a new Zap
2
Find Media Shield application, select it and press ‘Continue’
3
Choose your Media Shield account. Then press continue.
4
Then you can set the Trigger and click continue.
5
Finish your Zap configuration and publish it.
Note: check Tip #1: Sending Custom Fields / Variables to Zapier at the bottom fo this article if you want to send custom fields as well.
7
Now you should see your Zapier webhook in Zapier tab of Linked Helper launcher. You can change its name, assign it to another LinkedIn account, or make it unassigned (can be used by all LinkedIn accounts). You can filter only subscribed or unsubscribed triggers (trigger is marked as ‘unsubscribed’ when your Zap’s trigger is off).
8
Then you can add new action ‘SendPersonToZapier’ and select previously created Zapier webhook from the dropdown list. Press ‘Save’
Tip #1: Sending Custom Fields / Variables to Zapier
As Linked Helper 2 allows you to upload or set custom fields to profiles to use them in your message templates, you may want to send them through Zapier as well.
The problem is that Zapier doesn’t show them in the data sample when you set up your Zap:
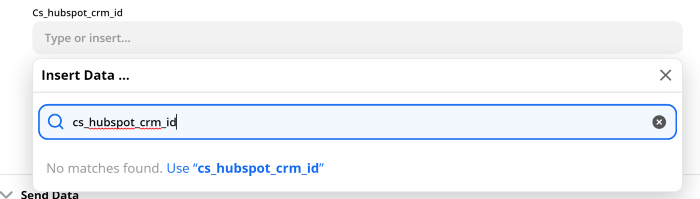
The workaround is simple: you just need double curly brackets.
{{cs_hubspot_crm_id}}

Zapier will change it to:

Don’t worry that Zapier shows “No data” for such variables. When you send data via LH2, you will receive custom variables at your target destination (CRM, Google Spreadsheet, …).